Showing posts with label VPC. Show all posts

Thursday, 4 February 2021

Elastic Kubernetes Service(EKS) in AWS

 To provision EKS cluster , we need the below prerequisites 

1. IAM user : where the user will have the permission to create and manage the EKS cluster.

Create role--> select EKS -->


Select EKS as below


Click on "Next permissions" --> select policy (EKS Service policy) -->Click Tags -->Review


Select "Create Role".

Now create cloud formation stack which will provision the below
1. VPC
2.Security groups
3.Subnets

For this , search for Services --> cloud formation-->create stack

In Amazon S3 URL , select URL which is already existed in the below link.

https://docs.aws.amazon.com/eks/latest/userguide/getting-started-console.html#eks-create-cluster

Since we are using here ap-south-1 region, you can replace whatever region you would like to.


Click Next , accept all the default settings and click on Next -->create stack.

Here we can see all the resources are provisioned by using this stack as below


Now lets create EKS cluster, search the same in AWS services.


Accept all default net working settings as below.


Accept all the default setting and review the cluster values then click on "Create".


Sunday, 20 September 2020

Terraform - Part 1

 Definition:

Automate the provisioning of resources over the cloud.

To learn this topic , we need to below tools and SW are ready in our system

Terraform:https://www.terraform.io/downloads.html

Visual studio code: https://code.visualstudio.com/download

AWS CLI: https://docs.aws.amazon.com/cli/latest/userguide/install-cliv2-windows.html

Programmatic access from Terraform to AWS console.

Lets create a IAM user to provide access to Terraform.

Click "Next permissions"

Once User created ,Make a note of secret key and access key IDs to configure the access from AWS CLI to the console.

Open command prompt and type AWS to check your CLI access.

type aws configure command


Next download and configure Terraform tool

Source docs.oracle.com

To see the terraform success installation, check as below


Now lets use Visual studio code editor in my case, you case whatever editor your convenient.

Create a directory and with simple file name, in my case sample.tf. Form name must have extension .tf as a naming convention.

Folder structure will be like below


sample.tf

provider "aws"{

region="us-west-2"

}

resource "aws_vpc" "main" {

  cidr_block       = "10.0.0.0/16"

  instance_tenancy = "default"  

  tags = {

    Name = "main"

  }

}

resource "aws_subnet" "subnet1" {

  vpc_id     = aws_vpc.main.id

  cidr_block = "10.0.1.0/24"

   tags = {

    Name = "Subnet1"

  }

}

Once you enter the vpc and subnet code , you need to initialise the terraform by using the below 

Before running to create AWS resources , lets see what we have us-west-2 region.

We have default VPC and subnets as below

VPC:

subnet:


Now execute "terraform apply" command in terminal and give "yes" as you want to approve to create the resources what you have asked.

See in above screen , we can see two resources are created ,lets open our console and check.

Check the resources in "us-west-2" region 

VPC:

subnet


With this we can easily provision the AWS resources with terraform code.
Once it successfully executes the creation of resources, it will create the state form where it has the code to create the resources in AWS.
In our case it will be like below.

Now lets learn deep out resource filed and how we can separate the variables and initialize them .
See vars.tf , how we are separating
execute again by using terraform apply 
This is how we can initialize the variables and execute them.
Now lets create multiple subnets using loops in terraform.

Since we are in us-west-2 region and lets check how many AZs are available at present.
Lets create CIDR blocks dynamically and create subnets against CIDR.
Now the vars.tf looks like below.
variable "region"{
    default="us-west-2"
}
variable "vpc_cidr"{
    default="10.0.0.0/16"
}
variable "subnet_cidr"{
    type=list(string)
    default=["10.0.5.0/24","10.0.2.0/24","10.0.3.0/24","10.0.4.0/24"]
}
variable "azs"{
    type=list(string)
    default=["us-west-2a","us-west-2b","us-west-2c","us-west-2d"]
}

sample.tf like below
provider "aws"{
  region=var.region
}
resource "aws_vpc" "main" {
  cidr_block       = var.vpc_cidr
  instance_tenancy = "default"
  
  tags = {
    Name = "main"
  }
}
resource "aws_subnet" "subnets" {
  count=length(var.azs)
  vpc_id     = aws_vpc.main.id
  cidr_block = element(var.subnet_cidr,count.index)
  
  tags = {
    Name = "Subnet1"
  }
}

apply the terraform and see the resources are created as below.


When you see the above pic, we have subnet names are equal. Lets change the name of the subnet using the count.index

Just change the Name = "Subnet-${count.index+1}". and apply terraform.


As of Now we are hardcoded region and AZs but we can get those also dynamically using data sources.

Just change the code in vars.tf as below
#variable "azs"{
 #   type=list(string)
  #  default=["us-west-2a","us-west-2b","us-west-2c","us-west-2d"]
#}
# Declare the data source
data "aws_availability_zones" "azs" {
  state = "available"
}

update the sample.tf as below
resource "aws_subnet" "subnets" {
  count=length(data.aws_availability_zones.azs.names)
  vpc_id     = aws_vpc.main.id
  cidr_block = element(var.subnet_cidr,count.index)
  
  tags = {
    Name = "Subnet-${count.index+1}"
  }
}

apply the terraform, so here we can see same output as above though we are getting dynamically the data of AZs.

Since we the subnets are created in single AZ like below

Lets create subnets in different AZs as you want.

sample.tf:
count=length(data.aws_availability_zones.azs.names)
  availability_zone=element(data.aws_availability_zones.azs.names,count.index)


Lets apply terraform
If you observe above pic, it created only 3 subnets again and 3 subnets deleted , because it make used the existing one and created the freshly with new AZs as below

Lets see other functions in Terraform.

Map:
Lets see without Map , how we can create ec2 instance using terraform.
vars.tf:
variable "region"{
    default="ap-south-1"
}
variable "ec2_ami"{
    default="ami-76d6f519"
}
provider.tf:
provider "aws"{
    region=var.region
}
ec2-instance.tf:
resource "aws_instance" "web" {
  ami           = var.ec2_ami
  instance_type = "t2.micro"

  tags = {
    Name = "HelloWorld"
  }
}

Apply terraform and check the EC2 is created.

In above code , we specified the region and AMI , But when we change the region  AMI id will change.
So , to get the AMI id based on the region we are using the Map.

Get the AMIs using Map and get the region using Lookup as below

vars.tf:
variable "region"{
    default="ap-south-1"
}
variable "ec2_ami"{
    type=map
    default={
        ap-south-1="ami-76d6f519"
        us-west-2="ami-e251209a"
    }
    
}
ec2-instance.tf:
resource "aws_instance" "web" {
  ami           = lookup(var.ec2_ami, var.region)
  instance_type = "t2.micro"

  tags = {
    Name = "HelloWorld"
  }
}

See the below there is no instance created in us-west-2 region
but the Ec2 instance is created in ap-south-1.


Thank you for reading 👍👍👍👍👍

Wednesday, 15 July 2020

VPC part 3

AWS Site-to-Site VPN and Peer to Peer connection on VPC


To enable or provide connection from your home or corporate network to AWS resources , AWS provides a feature called Site to Site VPN connection.
VPN connection refers to the connection between your VPCs and your own on premises network.

Key concepts of Site to Site VPN
VPN Connection: A secure connection between your on-premises network and your VPCs.
VPN tunnel: its a encrypted link where your data can pass from Customer network to or From AWS.
Each VPN can includes two VPN tunnels which can use for data high availability.
Customer gateway: This is AWS resource which will provide information about customer gateway device.
Customer gateway device: A physical device or software application on your side of the site-site VPN connection.

We can achieve site to site VPN connection by using the following interfaces.

  • AWS Management console
  • AWS CLI
  • AWS SDK
  • Query API
Limitation of site-Site VPN connection
  • This won't support IPV6 traffic
  • An AWS VPN connection that doesn't support mtu Path directory.
  • Also Make sure that your VPC connection CIDR block should not overlap with on premises IPs.

How Site -Site VPN works

Virtual Private Gateway: We can create a virtual private gateway and attach to the VPC from amazon side from which you want to create a site-site VPN connection.


%3CmxGraphModel%3E%3Croot%3E%3CmxCell%20id%3D%220%22%2F%3E%3CmxCell%20id%3D%221%22%20parent%3D%220%22%2F%3E%3CmxCell%20id%3D%222%22%20value%3D%22%22%20style%3D%22rounded%3D1%3BwhiteSpace%3Dwrap%3Bhtml%3D1%3BfontFamily%3DTimes%20New%20Roman%3B%22%20vertex%3D%221%22%20parent%3D%221%22%3E%3CmxGeometry%20x%3D%2240%22%20y%3D%2220%22%20width%3D%22780%22%20height%3D%22290%22%20as%3D%22geometry%22%2F%3E%3C%2FmxCell%3E%3C%2Froot%3E%3C%2FmxGraphModel%3E
When you create Virtual private gateway , you have to specify ASN (Autonomous system number) for amazon side, if you don't specify ASN , the virtual private gateway is created with default ASN (64512).Once its created it won't be changed.

Transit gateway: This will provides the interconnection with virtual private clouds and on premises network.We can modify transit gateway with virtual private gateway.

VPC Endpoints

It enables to you to directly connect with your VPCs to AWS resourcces where in you no need to create /use the below
  • NAT gateway/instance
  • Internet gateway
  • VPN connection
  • Direct connect
Endpoints are horizontally scaled,highly available virtual devices.
Types of Endpoints
  1. Interface Endpoints:Is an elastic network interface which provides private IP address private IP address from the IP address range of your subnet that serves as an entry point for traffic destined to a supported service.Since it has private IP adderess and it is powered by privatelink of AWS which provides Private connection with your device from AWS.
  2. Gateway Endpoints: Is a gateway that you specify as a target for a route in your route table for traffic destined to a supported AWS service. 

VPC Peer to Peer connection

This means providing connection between two VPCs either by using IPV4 or IPV6 address which are using the same network.

VPC peering can be between in your own VPCs or with another account VPC.
VPCs can be in different region.
To implement Peering connection , AWS uses the existing infrastructure , which does not uses neither NAT gateway or VPN connection .
There is no single point of failure or bottleneck with this feature.


To Provide a connection you do the following.
  1. The owner of the requester VPC sends a request to the owner of the accepter VPC to create the VPC peering connection. The accepter VPC can be owned by you, or another AWS account, and cannot have a CIDR block that overlaps with the requester VPC's CIDR block.
  2. The owner of the accepter VPC accepts the VPC peering connection request to activate the VPC peering connection.
  3. To enable the flow of traffic between the VPCs using private IP addresses, the owner of each VPC in the VPC peering connection must manually add a route to one or more of their VPC route tables that points to the IP address range of the other VPC (the peer VPC).
  4. If required, update the security group rules that are associated with your instance to ensure that traffic to and from the peer VPC is not restricted. If both VPCs are in the same region, you can reference a security group from the peer VPC as a source or destination for ingress or egress rules in your security group rules.
  5. By default, if instances on either side of a VPC peering connection address each other using a public DNS hostname, the hostname resolves to the instance's public IP address. To change this behavior, enable DNS hostname resolution for your VPC connection. After enabling DNS hostname resolution, if instances on either side of the VPC peering connection address each other using a public DNS hostname, the hostname resolves to the private IP address of the instance.


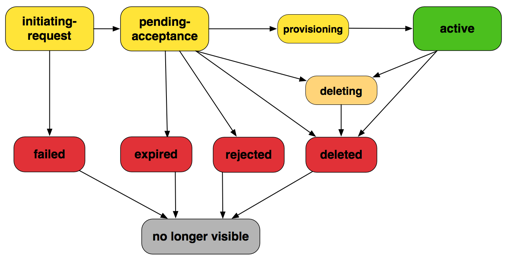
                            VPC peering connection lifecycle

limitations of Peering connections:
  • You cannot create a VPC peering connection between VPCs that have matching or overlapping IPv4 or IPv6 CIDR blocks. 
  • You have a quota on the number of active and pending VPC peering connections that you can have per VPC
  • VPC peering does not support transitive peering relationships.
  • You cannot have more than one VPC peering connection between the same two VPCs at the same time.

Saturday, 11 July 2020

VPC Part 2

VPC - NAT Gateway and NAT Instance

Scalability application:
When an application gives best performance when throughput
(input and output, which means requests and responses) increases is
called Scalability application

Always AWS application or architecture will meet below metrics to meet best app/design perspective.
  • Fault tolerance
  • Scalability
  • Cost effective
  • Availability 

NAT gateway and NAT Instance.

  • NAT Instance: It is a IaaS (Infrastructure as a Service) where we have to take overhead to maintain this.
  • NAT gateway: It is a PaaS(Platform as a Service), where we no need to take overhead and AWS will take care of it.
NAT must sit in the public subnet.
NAT allows only outbound connection.

NAT Instance implementation:

In a VPC , all the subnets will communicate each other by using default router.
Any subnet we can make it as public , when that subnet is connect to Internet Gateway.
We can configure secure access to internet by using NAT instance.
For ex: If an Ec2 which is in private subnet wants to connect to Internet ,
it will communicate with private router(custom router) which
again communicate with NAT instance , that is having connection with Internet.

Below architecture , shall implement in AWS.

So lets start creating of VPC as below
1.Login to AWS console
2.Search for VPC under services
See the below screen
Select VPC It will show below screen
Select create VPC and enter the details like below pic.

then click on "Create" button , The below screen appears
Then select one Private and one Public subnets to meet the requirement.
To do that , select "Subnets"-->Create subnet , Following screen appears
and fillout the details as mentioned below.
As per the screen , we are creating public subnet for now
also just by the name it won't become a Public subnet ,
it has to connect with Internet Gateway then it will become a public.

Then select create Button.
So Now go for another subnet where we will treat this as a private subnet.
Create as above and just name it as a Private-subnet and change the IP address.

At present these to subnets(Private/public) are connected with default/Main router.
So, As per the design we need to connect Private subnet with another router, let us create the same now.

The default route table already created when we create VPC(myapp-VPC)
,So as i mentioned above default route table is connected to all the subnets ,
to differentiate and meet above requirement lets create another route table with name "Private",
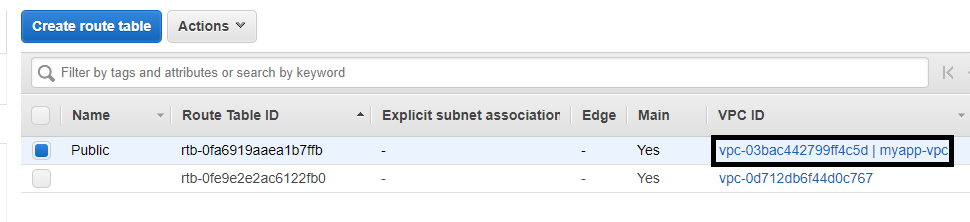
For easy recognition we shall name the existing route table as "Public".

Click on Route tables-->Create Route table
Name:Private (for easy recognition)
VPC:VPC ID of my app-vpc
Click create
But this Private route table is not associated with any subnets.

Always remember that custom route table is No as Main and it is not connected to any subnets.
So Now let us associate 
  • Private subnet with private route table  
  • Public subnet with public route table 
To do that , select Private route table -->below click on subnet associations -->Edit subnet associations
select Save button. By default another subnet(public) is associated with "Public route table".

Now Lets create Internet gateway(IGW) and associate with Public subnet.
So select Internet Gateways -->Create Internet gateway


then click "Create Internet Gateway" button, Once its created it won't associate with any VPC ,
we have to associate explicitly like below

Select "Attach internet gateway"
So , Now we need to connect this to our public route table.
 

Destination: 0.0.0.0/0  means public IPaddress which will connect to internet. 
Target: select IGW which we created by selecting "internet gateway" from dropdown.
The default route which will allow communication between subnets by default and we won't delete that.

NAT instance is regular EC2 instnace with NAT configurations/capability.
launch NAT instance as below


After selecting above , under "Configure Instance Details" select as below


and move ahead with storage and other details.
under Security group select as below

Now connect private router with NAT instance to access internet , this will help to connect private subnet with Internet when there is a need.


Source and Destination Check
  • Each EC2 instance performs source/destination checks by default. 
  • This means that the instance must be the source or destination of any traffic it sends or receives. However, a NAT instance must be able to send and receive traffic when the source or destination is not itself. 
  • Therefore, you must disable source/destination checks on the NAT instance.


Select "Yes Disable" .

Now we have to connect with NAT instance from putty. From there we can connect with Private Instance.
For this , we need to create a file with same name as key pair 
open the same .pem file in notepad.(Which is existed).
copy the content and paste it in .pem file which you are creating.

then ssh to the private instance like below
ssh -i k8s.pem ec2-user@192.168.1.197


Above permission denied screen because the pem file is not having the access.So, change the same by using below
chmod 400 k8s.pem

So Now again connect to private instance by ssh , Now you are able to connect and ping to google for checking the internet connection.

So, If we have any softwares or apps which needs internet connection we can connect and install or update by using this connection.

NATGateway:

  • This is not free for Free tier user , but you can try if you want to pay.
  • It involves Hourly basis charge.
  • It involves amount of data which is processed through NAT gateway.
NAT gateways --> Create NAT gateway -- enter the below details.
Click on "Allocate Elastic IP address" , it will automatically allocate and select Create NAT gateway like below.


Connect NAT gateway with Private route table like below

Private IP: 

  • Is the IP visible within VPC
  • By default every EC2 will get Private IP.
  • AWS uses DHCP for allocating private IPs
  • DHCP(Dynamic Host protocol) responsible for randomly finding unique IP for EC2 in a subnet.

Public IP

  • Accessible over Internet
  • It is assinged to EC2 
  • We choose public IP at the time of launching EC2 after launching EC2 we can't use.
  • This will change if we start and stop EC2 

Elastic IP

  • Is a static public IP
  • it won't change even if we stop EC2.
  • If we release Elastic IP, it will delete 
  • If we deassociate Elastic IP It will be there 
  • If we deassociate Elastic IP but not in use , still charges applicable for Elastic IP
  • This will be created by AWS separetly for your account
  • In one account one Elastic IP is free
  • Second EIP onwards charges applicable
  • Even for first EIP if that is not associated with running EC2 , it will be charge.
  • We can detach EIp from once instance and attach to other EC2